 Contents
Next
ISPConfig is a
software package that permits the easy management of servers, webspace,
resellers and single virtual hosts.
ISPConfig consists
of 3 levels:
- ISPConfig for
server administrators allows the management of servers, webspace,
resellers and customers.
- ISPConfig for
resellers allows the management of webspace, customers and virtual
hosts (sites).
- ISPConfig for
webmasters allows the management of sites, co-domains and mailboxes.
According to the 3
levels the manual is split into 3 sections:
- I Administrator
Manual
describes the services available for server administrators.
- II Reseller
Manual
describes the services available for resellers.
- III Customer
Manual describes the services available for customers.
Please note:
This structure does not mean that each section is independent from each
other. Level I contains levels II and III and level II contains level
III.
For a better overview the manuals I and II include links to the
applications that are available in the respective sub-levels and that
are described there.
In order to install
ISPConfig please read the installation manual.
The installation
manual is available in the following formats: HTML.
You can update the
ISPConfig system from one version to another if these versions belong
to the same main version (e.g. 1.x; i.e., you can update from version
1.1.12 to version 1.2.0). Please download your wanted ISPConfig version
to your server and proceed as if it was a new installation, not an
update. The installation routine will notice that there is already a
ISPConfig system on the server and will execute the necessary steps for
the upgrade.
If you want to
deinstall the ISPConfig system please login to the server as root on
the command line and execute the following command:
/root/ispconfig/uninstall
The uninstaller
gives you the following options to select from:
- Partial
Deinstallation: Only the ISPConfig system itself will be
uninstalled, but not the webs, users, DNS records etc. created by it.
- Complete
Deinstallation: The ISPConfig system and also the objects created
by it (webs, users, DNS records, etc.) will be uninstalled.
Logging into the
ISPConfig system is described in the respective manuals (chapter 1.1 in
the manuals I - III).
To log out, click on
"Logout"in the menu.

Please go to the URL
of your ISPConfig system (e.g. https://www.domain.tld:81 or
http://www.domain.tld:81; replace "www.domain.tld" appropriately) with
your Browser and enter your user name and your password into the form
"Login". Confirm by clicking on "Login".

The administrator's
interface consists of the following sections:

-
Menu with the areas "Management", "ISP Manager", "DNS Manager",
"Web-FTP", "ISP Invoice", "Tools", "Help" and "Logout".
-
Buttons: Directly beneath the menu there are buttons for actions
like �New reseller�, �New client�, etc. What buttons are shown depends
on the section you are in, e.g. �ISP Manager� or �DNS Manager�. The
sections �Management� and �Logout� do not have buttons.
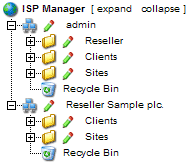
- Structure tree /
storage system: The structure tree is the storage system of the
ISPConfig manager. Depending on the chosen menu the following items are
shown: server data, resellers, customers, sites, users (ISP Manager)
and the DNS service (DNS Manager).
- Information
field "Server Status":
The information field "Server Status" is visible in the middle of the
screen after logging in. It shows the hardware status of your
processor(s), the usage of the server's drives and partitions, RAM and
the status of the server services (e.g. Apache web server) (see chapter
I-2.2).
The privileges of a
ISPConfig administrator include those of a reseller and a customer,
i.e. as administrator you can execute actions belonging to a reseller
or customer without having to login again.
Privileges of a ISPConfig administrator
- Change server
properties
- Create and
administrate resellers, read their statistics
- Create backups of
the ISPConfig database
- Edit DNS entries
- Create and
administrate customers, read their statistics
- Create and
administrate webs
- Create DNS entries
- Read a web's basic
data and statistics
- Create and
administrate users and email boxes
- Create and
administrate (sub)domains
- Apply for SSL
certificates (optional)
- Administrate MySQL
access data
- Change the
settings of his mailbox (password, spamfilter and antivirus settings)
|
|
|
|
|
|
|
|
The ISPConfig system
offers you two possibilities to save data you enter into a form:
- "Save"-Button:
Click onto the "Save"-button to save your entries. The information will
be submitted, and the structure tree as well as the start page will be
reloaded in your browser.

- Change the tab:
If a form consists of more than one tab you can simply change the tab
to save your data. The data of the old tab will be saved, and the new
tab will be loaded, whereas the structure tree will not be reloaded.
This technique of saving data allows you to process forms with more
than one tab in one pass and is one of the main characteristics of
ISPConfig.

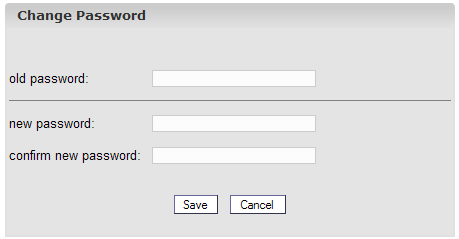
You can edit your
ISPConfig password under
"Tools" -> "Change Password".

Please enter your
current and your new password (2x) into the form "Change Password" and
click on "Save".
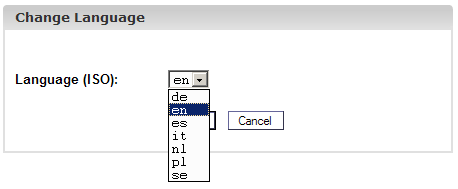
You can set the
language of your ISPConfig system under "Tools" -> "Change Language"
.

In the form "Change
Language" select the language the system should use for you and click
on "Save".
Please note:
The language setting only affects your own account. Other users of the
ISPConfig system (such as resellers or customers) can select their
language individually.
Passwords that you
entered in the ISPConfig system (e.g. reseller or customer passwords
for accessing the ISPConfig system; passwords for customers' MySQL
databases) will not be displayed in the ISPConfig system for
security reasons after they were saved! Thus, an empty password field
in a ISPConfig form does not mean that no password was entered before.
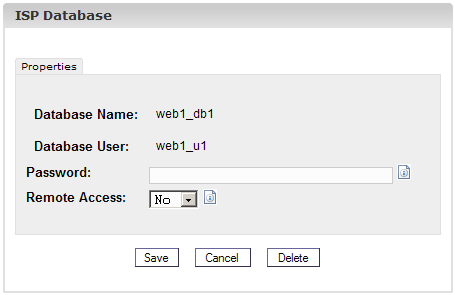
An existing
password does not get displayed after the reload of the respective
form.
Click onto the menu
item "Help".

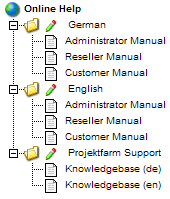
Here you will find
the administrator-, reseller- and customer-manual in English and German
in PDF format as well as links to the
knowledgebase on the Projektfarm website.
In addition to that
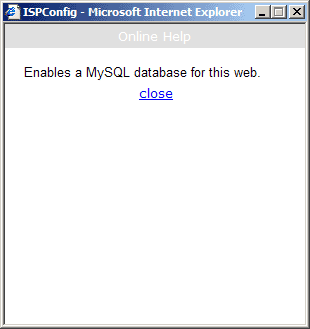
you can find a question mark next to many input fields in the ISPConfig
system:

If you click on the
question mark a small pop-up window with context-sensitive help will
open.
Depending on your
server some settings are done automatically at installation time of
ISPConfig. Further settings have to be done manually:
To view the general
settings or make changes, click on the menu "Management", open the
folder "Server" and click on the document "Settings".
- Server Name:
The default value is �Server 1�. This can be changed to whatever value
you want.
-
Hostname: The default value is �www�.
- Domain: The
domain under which the ISPConfig system can be reached.
- IP Address:
Enter your IP address here.
-
Netmask: Enter the netmask of your server.
- Admin Email:
The email address of the person that should get a message from the
ISPConfig system if one of the services on the server (e.g. web server)
fails.
-
IP List: If your server has more than IP address (the one
entered in the field "IP Address") enter the additional IP addresses
here (one per line). Important: The network will be configured
according to the data in "IP Address" and "IP List" (this feature is
available under Linux only)! Do not enter nonsensical information as
this could lead to your server not being accessible from the outside!
-
Site: The virtual site's properties are set to default values.
- FTP: The FTP properties are set
to default values. Activate "Save Log" if the FTP log file should be
saved after the nightly traffic analysis. The log file will then be
saved with the extension ".ispconfigsave" in the same directory.
Otherwise it will be deleted!
-
Email: The
email properties are set to default values. For the email traffic to be
analyzed correctly please check if the path and name of the email log
file is correct. Activate "Save Log" if the email log file should be
saved after the nightly traffic analysis. The log file will then be
saved with the extension ".ispconfigsave" in the same directory.
Otherwise it will be deleted!
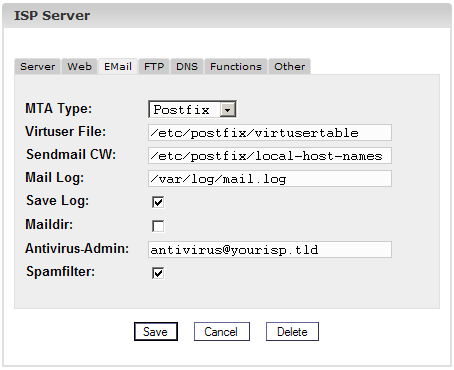
If you want to use
mailboxes in the Maildir format (in contrast to the traditional
Unix-Mailbox format), activate "Maildir". Attention: If you do
this during normal operation it is possible that emails that have not
been fetched from the server yet cannot be accessed anymore (only after
the previous value of "Maildir" has been re-established). It is best to
change this value when there are no users on the system or when you are
sure that there are no emails in users' inboxes at the time of the
change.
Specify the email address under "Antivirus-Admin" to which
notifications about identified viruses in emails should be sent.
Activate "Spamfilter", if you want to make available the spamfilter
to the users on your server.
-
DNS: The DNS properties are set to default values. Please enter
the two DNS servers and the email address that will be written to the
DNS records generated by the ISP-Manager and the DNS-Manager. If you
mark "Default MX" each zone (in this example "domain.tld") created by
the DNS-Manager will get an A record of the form
mail A
192.168.0.100
as well as an MX record of the form
MX 10 mail.domain.tld.
automatically. "192.168.0.100" will be replaced by the respective
IP address.

- Functions:
If Frontpage Extensions are installed on the server you can activate
them here for the ISPConfig system. If you do so and a new web is
created, Frontpage can be added to that web as a feature. If you do not
activate Frontpage Extensions here or if the ISPConfig system cannot
find the Frontpage executable Frontpage cannot be added to a web as
feature.
Please note: Currently only Frontpage 2002 under Apache
1.3.x is supported!
- Other: Here
you can specify the User-ID and Group-ID from which on the ISPConfig
system creates users and groups. You should choose values that do not
conflict with existing User-IDs and Goup-IDs. In addition to that you
should not change these values in a ISPConfig system which already is
at work! Furthermore you can specify salutatory emails for customers
and resellers as well as enter HTML code for your own standard index
pages that will be created when a new site is created. Please note that
salutatory emails will only be sent if the field "Email" in the
customer's/reseller's master data contains a valid email address.
The hardware data of
your server is loaded into the ISPConfig system at installation time.
In addition to the hardware data the ISPConfig system gives some
information about the status and usage of the server. This information
is visible in 2 places:
In the information
field "Server Status" that appears upon login or by clicking on "ISP
Manager". It is also visible under "Management" in the folder "Server".
There you need to click on "Status".
The following
information is available:
- Server Online
since: Shows how long the server has been online.
- Users Online:
Shows how many users are currently logged into the server.
- CPU Usage:
Shows the average usage of the processor in the last 1, 5 and 15
minutes.
- Drive/File
Usage: Shows the total size, the used and unused part, the usage in
percent as well as the name of the drive.
- RAM: Shows
the free RAM in KB.
- CPU: Shows
the hardware information of the server's processor.
- Services:
Shows the status of the following services: HTTP server (Apache), FTP
server, SMTP server, BIND server and MySQL server.
The data of all
resellers, customers, sites, domains, users and email addresses is
saved in the ISPConfig database. Thus it is highly recommended to make
a database backup at regular intervals, to check, to optimize and - if
necessary - to repair the database.
This is how you can
access the database functions:
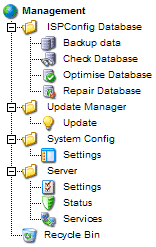
Click on the menu
"Management".
In the structure
tree click on "ISPConfig database".
- Backup Data:
A backup of the ISPConfig database is created.
- Check Database:
By clicking on "Check Database" you receive a list of all database
tables with their status, i.e. "OK" or "damaged".
- Optimize
Database: By clicking on "Optimize Database" you can optimize the
tables in the ISPConfig database. As a result you get a list of all
tables with the status "OK" if the optimization has taken place or with
the status "Table is already up to date", if optimization is not
necessary.
- Repair Database:
By clicking on "Repair Database" damaged tables in the ISPConfig
database are repaired. This is indicated by the status "OK".
The ISPConfig system
allows you to start/stop/restart services, to monitor services (if a
monitored service fails a warning email will be sent to the
administrator; see chapter I-2.1, "Admin Email") and to setup a
firewall (in case either iptables or ipchains is available on your
system).
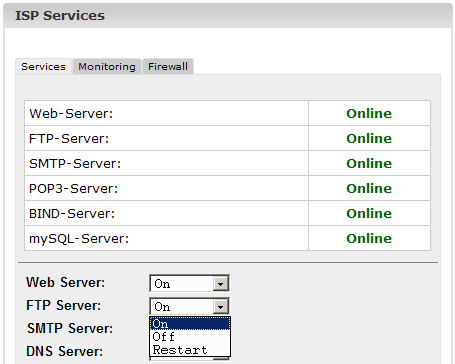
Click on
"Management" -> "Server" -> "Services". The form "ISP Services" will be
opened with the tabs "Services", "Monitoring" and "Firewall".

2.4.1
Start/Stop/Restart Services
In the tab
"Services" you can see the status of some important services on the
server (online/offline), and you have the possibility to
start/stop/restart services. Please confirm your changes by clicking on
the "Save" button or by going to another tab (see chapter I-1.4
"Saving").
2.4.2 Monitor
Services
Under "Monitoring"
you can specify services that are to be monitored by the ISPConfig
system. The default setting is to monitor the services "Web Server",
"FTP Server" and "MySQL Server". The monitoring takes place once every
30 minutes. If a service fails, an email will be sent to the
administrator (see chapter I-2.1, "Admin Email").
Please note:
If your mail server fails, no warning email can be sent to the
administrator!
This is how you
setup the monitoring of further services:
Click on the button
"Add".
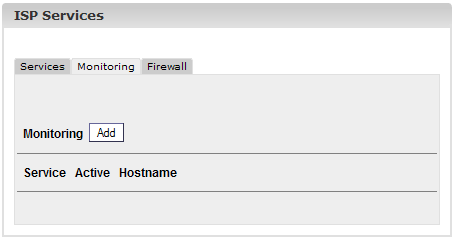
The form "ISP
Monitor" is loaded.
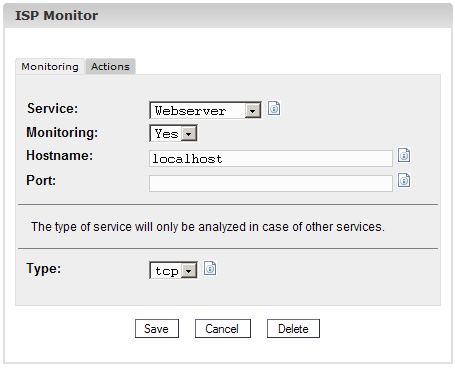
Please enter the
following information:
- Service:
Please select the appropriate service. You have the choice between
"Webserver", "Bind DNS", "Mailserver", "FTP Server", "POP3 Server" and
"Other". Your choice is important for the way the service will be
checked for availability. Example: If you select "Webserver" the system
checks if a service of the type "tcp" is running on the port specified
by you. You can choose between "tcp" and "udp" under "Type" only if you
select "Other".
The following allocation "Service" <-> "Type" exists:
|
Service |
Way of Monitoring |
|
Webserver |
tcp |
|
Bind DNS |
tcp |
|
Mailserver |
tcp |
| FTP
Server |
tcp |
|
POP3 Server |
tcp |
|
Other |
Can be selected under "Type". |
- Monitoring:
Yes or No.
- Hostname:
The host on which the service should be monitored, normally
"localhost".
- Port: The
port on which the monitoring should take place. You have to specify a
port because it could be that you have your services configured on
other ports than the default ones.
List of Standard Ports:
|
Service |
Standard Port |
|
Webserver |
80 |
|
Bind DNS |
53 |
|
Mailserver |
25 |
| FTP
Server |
21 |
|
POP3 Server |
110 |
- Type: Please
select the type of monitoring ("tcp" or "udp"). This is of importance
only if you have selected "Other" under "Service".
Then click on
"Save", or change the tab.
In the tab "Actions"
you can enter a shell command which will be executed if the respective
service is offline (e.g. a command to restart the service):
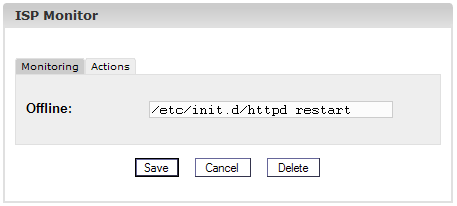
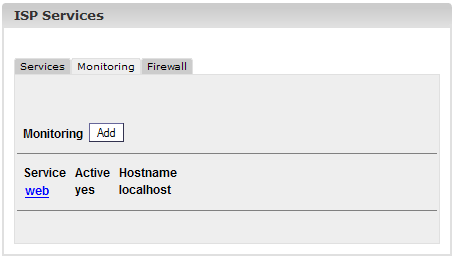
After the
information has been saved the services which are to be monitored are
listed in the form "ISP Services" in the tab "Monitoring" and can be
edited there.
2.4.3 Firewall
In the tab
"Firewall" you can add new firewall rules or edit existing ones. The
firewall can only be active if you have started it in the tab
"Services". By default the firewall is inactive.
There are some
firewall rules implemented in the ISPConfig system by default:
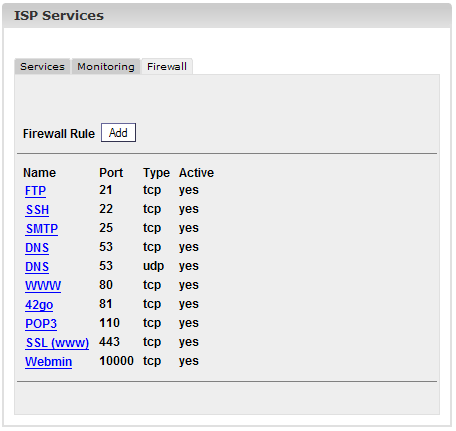
There are two
possible conditions:
- A
port (and thus the service running on it) can be reached from the
outside and is not blocked by the firewall: "yes" is shown in the
column "Active".
- A
port cannot be reached from the outside because it is blocked by the
firewall: This is the case for all ports where "no" is in the column
"Active" and also for all ports not listed here at all!
Existing rules can
be edited by clicking on the name of the rule; the button "Add" lets
you add new rules.
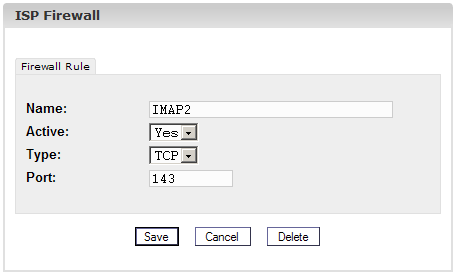
The following
information is necessary:
- Name: The
name of the rule. For example, if you create a rule for the DNS server
you can name the rule "DNS" in order to be able to allocate it
afterwards.
- Active:
"Yes" makes the port being reachable from the outside, "No" blocks it.
- Type: The
type of the port, "tcp" or "udp".
- Port: Please
enter the port (as number) for which the rule should be valid.
Please note:
In order to prevent that the server cannot be reached from the outside
at all (not even by the administrator) the ISPConfig system lets you
block all ports except port 22 (SSH) and port 81 (the ISPConfig
system)! If you try to block these ports, this will be ignored by the
ISPConfig system!
You can reach the
Update Manager under "Management" -> "Update Manager" -> "Update". It
is a comfortable interface to install ISPConfig updates or tools
provided by Projektfarm GmbH such as webmail, phpMyAdmin or a
portscanner.
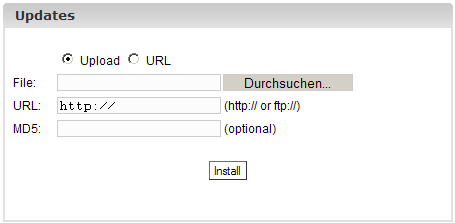
There are two ways
to install updates:
- You download the
update from the Projektfarm website to your local hard disk. Then you
mark "Upload", insert the update with the "Browse" button into the
field "File" and click on "Start Installation". The field "URL" will
then be ignored.
- You install the
update directly from the Projektfarm website. In order to do so mark
"URL" and insert the URL of the update in the field "URL". Then click
on "Start Installation".
If Projektfarm GmbH
provides an MD5 for the update you can copy it into the field "MD5".
The ISPConfig system will then compare the "real" MD5 (which the system
calculates from the update) with the MD5 you have inserted and thus
check the integrity of the update. If the MD5s differ the update will
not be installed.
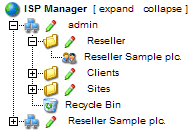
You can manage
resellers via the structure tree. Each reseller is shown twice in the
structure tree:
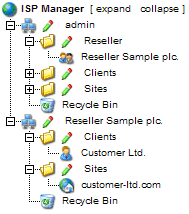
- Reseller
Management:
In the folder "Reseller" you can find the master data, the limits
and access data of all resellers. This folder is visible only to the
administrator. Learn how to add a new reseller in chapter I-3.1.
- Reseller
interface:
In addition to the reseller management every reseller is shown as a
group of their own with the sub-folders "Clients" and "Sites" in the
structure tree. This display is the same as the interface of the
respective reseller. Here the administrator and the respective reseller
can carry out actions related to the reseller (e.g. add customers,
manage sites etc.).
Adding a reseller is
done in 5 steps.
1. Step: Open the
form "ISP Reseller"
Click on the button
"New reseller".

The form "ISP
Reseller" appears with the opened tab "Master Data".
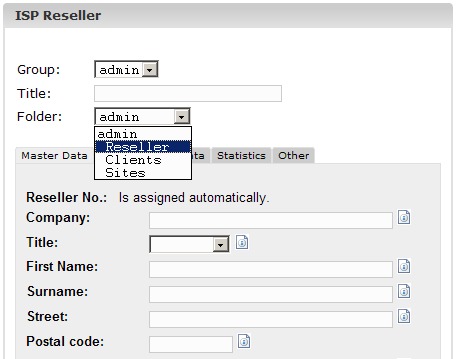
2. Step: Assign
title, folder and master data
- Title: Provide a title under which
the new reseller should appear in the structure tree.
- Folder: Choose the folder
"Reseller". Alternatively you have the possibility of creating a
subfolder for the resellers which can then be chosen from here. Learn
how to create folders in manual II in chapter 4.1.1.
- Master Data:
Under this section
you can enter the master data of the new reseller. Some of this
information is optional.
- Save Reseller:
By clicking on
"Save" the new reseller is saved and appears in the structure tree
under the title you have provided. There you can click on the new
reseller to complete the missing steps. OR: By clicking on the section
"Limits" you can go directly to the next step. This way the master data
is saved but the structure tree is not updated. This happens by
clicking on "Save" or by clicking on the menu "ISP Manager".
3. Step: Limit
webspace, sites, users and domains
Click on the tab
"Limits".
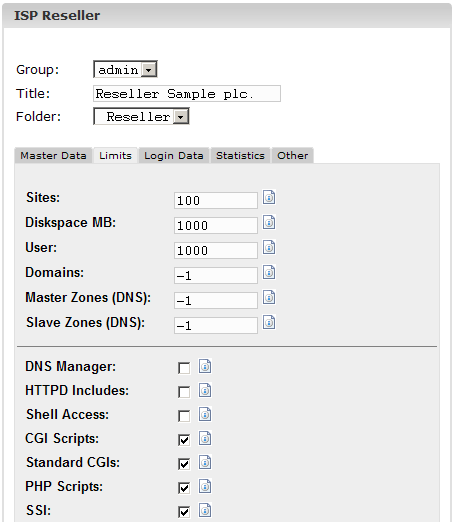
- Sites: The
value entered here represents the number of virtual hosts (sites)
available to the reseller and their customers. If the reseller tries to
go beyond this limit they will get an error message. The default value
is -1 which means "Unlimited".
- User: Here you can limit the
number of users that the reseller and their customers can create. If
the reseller tries to go beyond this limit they will get an error
message. The default value is -1 which means "Unlimited".
- Domains:
Here you can limit the number of domains that the reseller can create.
If the reseller tries to go beyond this limit they will get an error
message. The default value is -1 which means "Unlimited".
- Domain DNS:
Specifies for how many webs of the reseller the "Create DNS" option in
the respective web form is available.
- HTTPD Includes:
If you activate this the reseller is able to write additional Apache
directives into the virtual host containers of the webs that are
allocated to him (see chapter II-3.1 "Apache Directives"). This might
be a security threat.
- DNS Manager:
If you activate this the reseller is allowed to use the DNS Manager in
order to create and edit his own DNS records.
4. Step: Enter
access information for the reseller (username and password)
Click on the
tab"Login Data ".
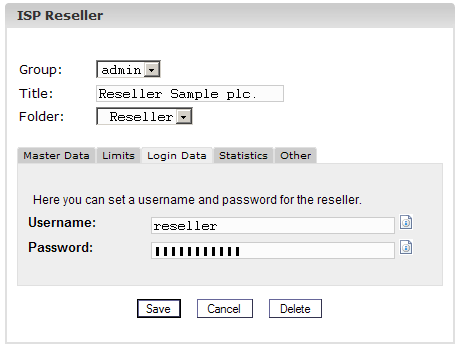
- Username:
The username of a reseller should be unique, i.e. you cannot assign the
same username to 2 different resellers.
- Password:
After you enter a password and click on "Save" or go to another tab,
the password disappears and becomes invisible.
5. Step: Save
Click on "Save".
Open the folder
"Reseller" in the ISPConfig structure tree and click on the reseller
you want to edit so that the "ISP Reseller" form appears. Make the
desired changes and click on "Save".
- Change Title:
In some cases it might be necessary to change the title of a reseller,
e.g. if a second reseller with the same name (such as Miller) has
appeared.
- Change Reseller
Master Data: If the address, telephone number etc. of a reseller
changes, you can update the reseller in the section "Master Data" and
click on "Save".
- Change Limits
of Sites, Domains and Users: Decreasing the limits for webspace,
sites, domains and users of a reseller is only possible if the values
of the existing sites of the given reseller are in the new range.
Otherwise you will get an error message. The form for editing the
limits can be found in the tab "Limits".
- Change User Name
and Password: The user name of a reseller can be changed in the tab
"Access Data". After clicking on "Save" the reseller can only login
with his new user name. As long as you do not type anything in the
(empty) field "Password" the old password will still be effective.
- Forgot your
password? / Change password: A reseller's password can be changed
in the tab "Access Data". After clicking on "Save" the password becomes
invisible.
- Management of
Resellers in different Folders: You can organize the resellers in
different subfolders. Learn how to create subfolders in chapter
II-4.1.1. To move a reseller into another folder select the
corresponding folder in the field "Folder" at the top of the form (see
chapter II-4.1.2).
- Delete
Resellers:
Open the form of the reseller you want to delete and click on "Delete".
Please note: A reseller can only be deleted if no customers are
assigned to him. If this is not the case you have to delete the
reseller's customers first, or assign the customers to another reseller
or to the administrator.
You can get an
overview of the resellers and your own customers by viewing the
structure tree:
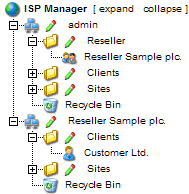
The applications
affecting customers can be carried out by resellers in the ISPConfig
reseller level. Thus they get touched only briefly in here. Learn more
about them in the Reseller Manual.
The following customer related actions can be taken:
- Add a new
customer:
Click on the button "New Customer" and follow the steps described in
chapter II-2.
- Assign a
customer to another reseller:
Open the document of the customer in the structure tree. In the field
"Group" in the form "ISP Customer" choose the corresponding reseller or
yourself as admin. In the field "Folder" select the folder "Customers"
or another folder if available. Click on "Save".
- Delete a
customer:
Click on the customer to be deleted in the structure tree. The
corresponding form opens. Click on "Delete".
- Customer
Statistics: Every customer has his own statistics which can be seen
in the tab "Statistics" in the customer's form.
The management of
the administrator's sites is done via the folder "Sites". Resellers'
sites can be managed via the subfolder "Sites" in the reseller's
folder.
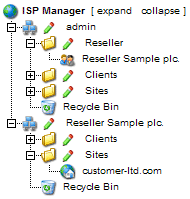
Applications related
to sites can also be carried out by resellers and to some extent by
customers. Here is only a brief list.
Reseller Level:
- Add a new site:
( see II-3.2)
- Delete a site:
(see II-3.2)
- Change limits of
sites, users and domains:
(see II-3.2)
- Change a site's
additional features:
(see II-3.2)
Customer Level:
- Adding and
managing users:
(see III-2.2)
- Adding and
managing co-domains:
(see III-2.3)
- Apply for an
SSL-certificate:
(see III-2.4)
- Change MySQL
access data:
(see III-2.5)
- View site
statistics: (see III-3)
4.3.1 Create DNS
Entries (see Reseller Manual)
A DNS entry for a
site or co-domain is created as follows:
1. Step: Open
Site Form.
In the structure
tree click on the corresponding client, go into the register "Webs" and
click on the IP address of the corresponding web.
Or:
Open the
corresponding site in the structure tree.
2. Step: Open a
co-domain and activate it (optional).
Go to the tab
"Co-Domains" and click on the IP address of the co-domain.
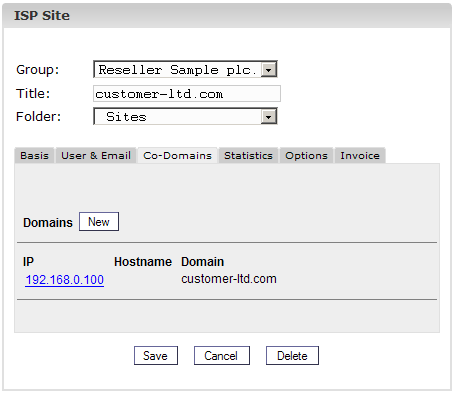
3. Step: Activate DNS.
Check "Create DNS"
and "Create DNS MX".
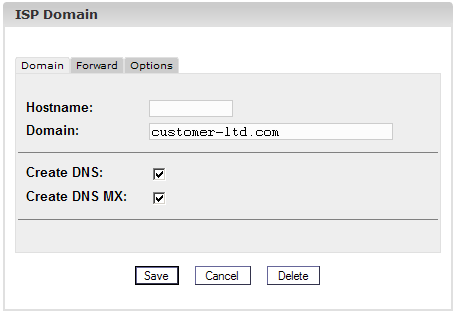
4. Step: Save.
Click on "Save".
Now the site is
visible as a new entry in the "DNS Manager".
4.3.2 Secondary-DNS
Entries (Slave Zone)
This is how you
create a Secondary-DNS entry (Slave Zone):
1. Step: Open
Slave Zone Form
Click on
"New Slave".
2. Step: Create
Slave Zone
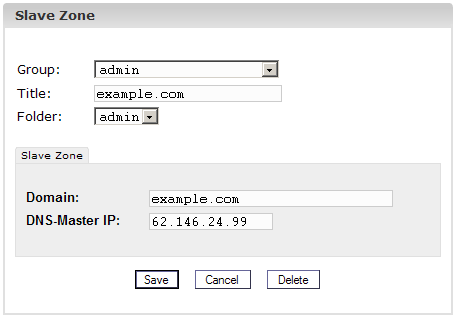
- Domain:
Enter the domain that the Secondary-DNS entry is for.
- DNS-Master IP:
Enter the IP address of the Primary-DNS server of the domain.
3. Step: Save
Click on
"Save".
4.3.3 Edit DNS
Entries.
You can edit DNS
entries as follows:
Click on the menu
"DNS Manager".
In the structure
tree click on the DNS entry to be edited.
- Delete DNS
Entries:
Open the entry and click on "Delete". The entry is now in the dustbin
and can be restored from there.
- Search Function:
You can search for whole DNS entries as well as A records, C-Name
records and MX records. Click on the button "Search", select the
corresponding document. Enter your search criteria and click on
"Continue". A list with matches to your search criteria is displayed.
Learn more about the search function in chapter II-4.2.
The ISPConfig
statistics contain information about the usage of webspace and traffic.
By selecting the
respective reseller in the structure tree you (as ISPConfig
administrator) can view statistics about the traffic caused by the
reseller.
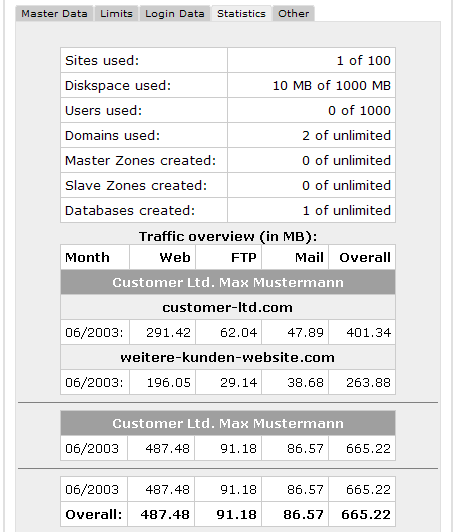
In the form "ISP
Reseller" (in the tab "Statistics") you can find information about the
web-, email- and FTP-traffic of the reseller, subdivided into the
customers of the reseller.
Customer statistics
can also be seen by the corresponding reseller and are described in
chapter II-5.1.
Site statistics can
also be seen by the corresponding reseller and are described in chapter
II-5.2.
Webalizer statistics
can also be seen by the corresponding reseller and are described in
chapter II-5.3.
Web-FTP is treated
in chapter III-4.
The following
additional software is available for the ISPConfig system:
- Webmail: A browser
interface for email boxes.
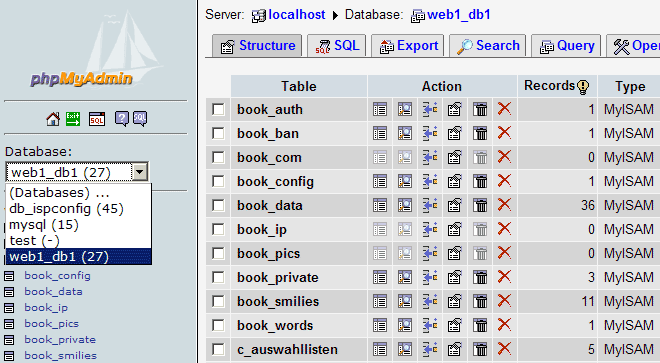
- phpMyAdmin: A
browser interface for the administration of your MySQL databases.
The software is
available for free on the
ISPConfig website and can be installed via the "Update Manager"
(see chapter I-2.5). After the installation you can find links for both
applications under "Tools".
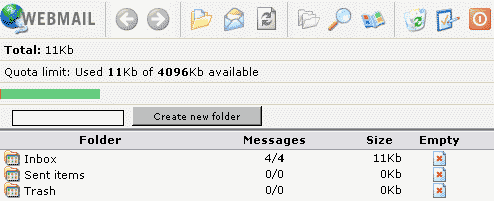
The application used
as email interface is called "Uebimiau". Further information can be
found on the website of the Uebimiau project: http://uebimiau.sourceforge.net/ .
The application can
be accessed via the link under "Tools" or via the folder "webmail"
which is located in the web of the ISPConfig system, thus
https://www.domain.tld:81/webmail/ where www.domain.tld has to be
replaced appropriately.
Further information
about phpMyAdmin can be found under
http://www.phpmyadmin.net/ .
The application can
be accessed via the link under "Tools" or via the folder "phpmyadmin"
which is located in the web of the ISPConfig system, thus
https://www.domain.tld:81/phpmyadmin/ where www.domain.tld has to be
replaced appropriately.
The ISPConfig system
can be started/stopped manually from the command line. Login to your
command line as root and execute the following command:
/etc/rc.d/init.d/ispconfig_server start|stop|restart (RedHat and
Mandrake)
or
/etc/init.d/ispconfig_server start|stop|restart (SuSE and Debian).
If you use vsftpd as
FTP server on your system this service will not be run by inetd/xinetd
after the installation of the ISPConfig system but by the
ispconfig_tcpserver which comes with the ISPConfig system. This happens
in order to make sure that vsftpd can handle one Anonymous-FTP account
per IP address. Under inetd/xinetd vsftpd can only handle one
Anonymous-FTP account per server even if the server has multiple IP
addresses. In order to avoid this disadvantage compared to the proftpd
server the ISPConfig system uses the ispconfig_tcpserver.
vsftp can be
started/stopped via the following command:
/etc/rc.d/init.d/ispconfig_tcpserver start|stop|restart (RedHat and
Mandrake)
or
/etc/init.d/ispconfig_tcpserver start|stop|restart (SuSE and Debian).
If you use proftpd
as FTP server nothing changes.
The following Cron
Jobs are run by the ISPConfig system:
| Command
|
Description |
Time |
|
/root/ispconfig/php/php /root/ispconfig/scripts/shell/logs.php &>
/dev/null |
Analysis of the Apache log files for the ISPConfig traffic statistics
| 23:59h |
|
/root/ispconfig/php/php /root/ispconfig/scripts/shell/ftp_logs.php &>
/dev/null |
Analysis of the FTP log files for the ISPConfig traffic statistics
| 23:59h |
|
/root/ispconfig/php/php /root/ispconfig/scripts/shell/mail_logs.php &>
/dev/null |
Analysis of the mail log files for the ISPConfig traffic statistics
| 23:59h |
|
/root/ispconfig/php/php /root/ispconfig/scripts/shell/cleanup.php &>
/dev/null |
Deletion of the backups of webs that were deleted from the recycle bin
| 23:59h |
|
/root/ispconfig/php/php /root/ispconfig/scripts/shell/webalizer.php &>
/dev/null |
Creation of Webalizer Statistics |
04:00h |
|
/root/ispconfig/php/php /root/ispconfig/scripts/shell/check_services.php
&> /dev/null |
Monitoring (see chapter I-2.4.2) |
once every 30 min. |
In a newly created
web you find the following folders with the following permissions:

- cgi-bin:
Here you can save Perl scripts that should be executed by the web
server (if "CGI Scripts" is activated for the site).
- log: This is the folder where the
web server saves its log files for the site.
- ssl: If this
is an SSL web you can find the necessary SSL files here (e.g. SSL
request, SSL certificate).
- user: This
is the folder where the home directories of the users belonging to the
site are created. For the user "testuser" you can find the directory
"testuser" under "user".
- web: This
folder is the Document Root for the site, i.e. this is the place to
save the files/folders that should be accessible via internet.
If there is no
administrator for the site (see chapter III-2.2.1), the folders belong
to the user the Apache web server is running under by default (here
"nobody"); otherwise they belong to the administrator of the site (in
this case "web5_admin").

The group of the
folders is always the group of the respective site, in this case
"web5".
Starting from
version 1.2.0 of ISPConfig you can write manual additions to the
following configuration files (the additions will not be overwritten by
the ISPConfig system):
- virtusertable
(Sendmail/Postfix)
- local-host-names
(Sendmail/Postfix)
- named.conf (BIND
DNS-Server)
- Zone-Files (BIND
DNS-Server)
- Reverse-Zone-Files
(BIND DNS-Server)
You will find one of
the following two lines in each of these files:
- #### MAKE MANUAL
ENTRIES BELOW THIS LINE! ####
- //// MAKE MANUAL
ENTRIES BELOW THIS LINE! ////
After this line you
can write additional information in these files.
Additions for the
virtual host container of a site can be written to the field "Apache
Directives (Optional)" in the "Basis" tab of the corresponding site
(see chapter II-3.1).
 Contents
Next

 Contents
Next


![]()

![]()


 Contents
Next