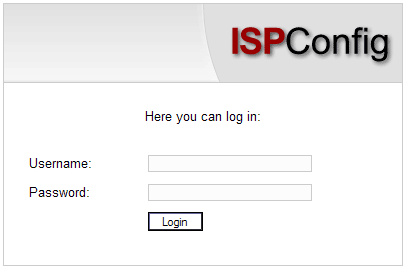
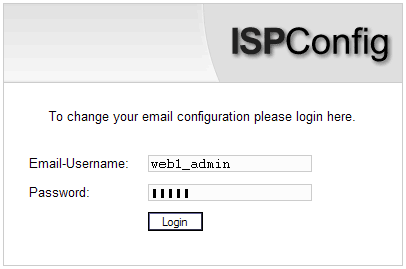
After you have received your user name and password and the url of the ISPConfig system from your reseller you can login. Please go to the URL of the ISPConfig system (e.g. https://www.domain.tld:81 ; "www.domain.tld" has to be replaced appropriately) with your browser and enter your user name and password in the form "Login". Confirm by clicking on "Login".
The customer interface consists of the following sections:
![]()
As an ISPConfig customer you can do the following tasks:
|
The ISPConfig system offers you two possibilities to save data you enter into a form:
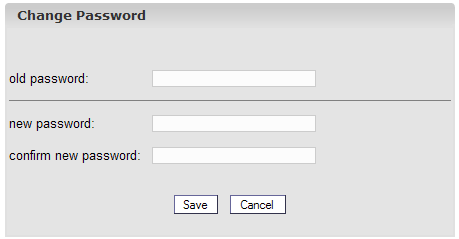
You can edit your ISPConfig password under "Tools" -> "Change Password".
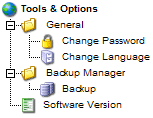
Please enter your current and your new password (2x) into the form "Change Password" and click on "Save".
You can set the language of your ISPConfig system under "Tools" -> "Change Language" .
In the form "Change Language" select the language the system should use for you and click on "Save".
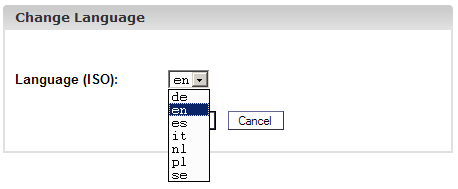
Please note: The language setting only affects your own account. Other users of the ISPConfig system (other customers) can select their language individually.
Passwords that you entered in the ISPConfig system (e.g. reseller or customer passwords for accessing the ISPConfig system; passwords for customers' MySQL databases) will not be displayed in the ISPConfig system for security reasons after they were saved! Thus, an empty password field in an ISPConfig form does not mean that no password was entered before.
An existing password does not get displayed after the reload of the respective form.
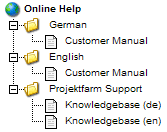
Click onto the menu item "Help".
![]()
Here you will find the customer manual in English and German in PDF format as well as links to the knowledgebase on the Projektfarm website.
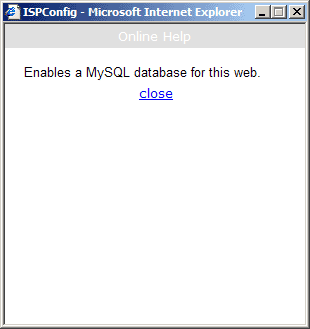
In addition to that you can find a question mark next to many input fields in the ISPConfig system:
![]()
If you click on the question mark a small pop-up window with context-sensitive help will open.
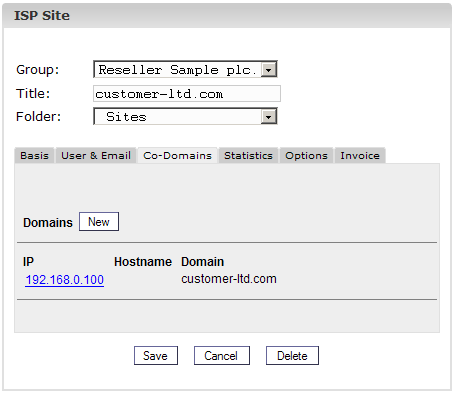
All sites you manage
with ISPConfig appear in the structure tree. By clicking on the title
of a site you can see its details and edit some of its data.
The basic data - visible on the tab "Basis" - can only be edited by your hosting company and the ISPConfig administrator.

The basic data contains the following information:
Basic Data:
Information about
the limits:
To see the current usage of your site (webspace, number of users and domains) go to the section "Statistics" (see chapter III-3).
Information related
to site features:
The value "1" indicates that the feature is activated.
The management of a site's users and email boxes is done via the form "ISP Site". To add or edit a user click on the corresponding site in the structure tree and in the form that opens go to the tab "User & Email".

Adding a user is
done in 6 steps:
1. Step: Open new
form "ISP User".
In the structure
tree click on the site to which you want to assign the new user.
Go to the tab "User
& Email".
Click on the button "New".
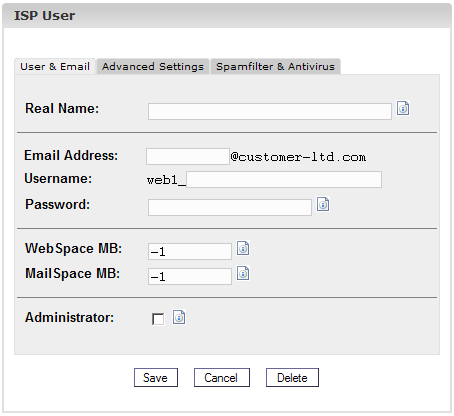
2. Step: Provide a name, user name and password.
3. Step: Limit
storage space of the user.
This is recommended if the overall webspace is low. In the field "Disk Space MB" enter the amount in MBs you want to assign to the new user. "-1" means "Unlimited".
See appendix 1 "Correlation Webquota <-> Mailquota" for information about the correlation between "WebSpace MB" and "MailSpace MB".
4. Step:
Options.
The options can be
selected now or later.
5. Step: Save.
Click on "Save" to
save the new user, click on "Reset" to abort the process.
The creation of an email forward is useful if the user of the mailbox already owns an email address and does not want to have another one.
C
lick on the name of the user on the tab "User & Email".
Go to the tab
"Advanced Settings" and enter the email address to which incoming mails
should be forwarded in the field "Forward:".
Click on "Save".
The creation of an
email alias makes sense for example if many emails do not arrive
because the sender used another spelling of the email address.
O
n the tab "User & Email" click on the name of the user.
Go to the tab
"Advanced Settings". In the field "Email Alias" enter your desired
aliases (e.g. different spellings like "meyer", "maier") (one per
line). An alias is the part in front of the �@� so you need not enter
something like �@mycompany.com�.
Click on "Save".
With the
autoresponder you have the possibility to automatically send replies to
incoming mails (e.g. if you are on holidays).
Check "Autoresponder" and enter your autoresponder message in the field "Message" below. To deactivate the autoresponder, simply uncheck "Autoresponder".
On the tab "Spamfilter & Antivirus" you can enable virus and spam protection for a user's inbox.

If the Mailuser Login is activated for a site (tab "Basis"), a user can make changes himself to his email settings (password, spamfilter and antivirus settings) by logging in under https://www.domain.tld:81/mailuser or. http://www.domain.tld:81/mailuser:
In the structure
tree select the site to which the user you want to delete is assigned.
In the form "ISP
Site" go to the tab "User & Email" and select the user to be deleted.
Click on "Delete".
Since this feature
is a security risk it will only be granted in exceptional cases by
server administrators.
This feature is
active if you find the value "1" next to "Shell Access" on the tab
"Basis". If this is the case this privilege can be given to users of
the site.
To do this go to the
tab "User & Email".
Select a user.
Check "Shell Access" in the form of the user and click on "Save".
Every user of a site has his own home directory in the folder "user". For example, the user "testuser" has the home directory "user/testuser". If FTP access is allowed for the site a user (if he is not the site administrator, see chapter III-2.2.1) will find himself in his home directory after the FTP login (thus "user/testuser").
In every home directory you can find the folder "web" whose contents can be reached through the internet via
http://www.domain.tld/~testuser/
or
http://www.domain.tld/users/testuser/ ,
where "testuser" and
"www.domain.tld" have to be replaced appropriately.
.
The administration
of domains is done on the tab "Co-Domains" of a site. Here you can add
new domains and configure forwards.
You can add a new
co-domain as follows:
1. Step: Open
form.
In the structure
tree select the site to which you want to assign a new domain.
Go to the tab "Co-Domains".
Click on the button
"New".
2. Step: Enter
host and domain name.
3. Step: Save.
Click on "Save" to
save the information or on "Reset" to abort the process.
The option "Forward"
is useful if you want domains to point to another URL or to another
folder of the site than the Document Root.
A forward is created
as follows:
Click on the
corresponding site in the structure tree.
Go to the tab
"Co-Domains".
Click on the IP
address of the domain.
Click on the tab "Forward". Here you can specify the target of the forward, e.g. another URL or a path to a directory of your site.
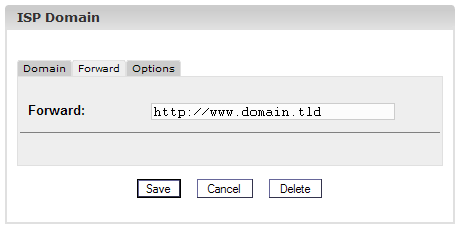
Forward to a
URL
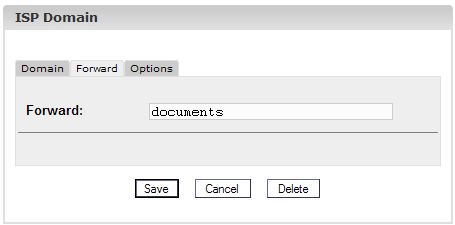
Forward to the
folder "documents" in the folder "web" of the site
Click on "Save".
Under "Options" you can select if the local server is responsible for emails targeted to this co-domain ("Local Mailserver", default value) or not (the emails are treated by an external mail server).
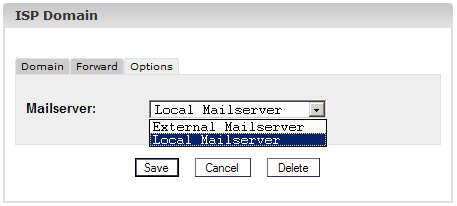
Background: May an
external mail server be responsible for the domain domain.tld. You are
logged in on the local server (e.g. with a webmail interface) and want
to send an email to another mailbox of domain.tld which means that this
mail has to be sent to the external mail server because it is
responsible for emails to domain.tld. If you have selected "Local
Mailserver" under "Options" the local mail server will feel responsible
for this email which means the email will not leave the local server
and arrive the correct mail box. For such cases you have to select
"External Mailserver" (see chapter III-2.6).
A co-domain is
deleted as follows:
Select the
corresponding site in the structure tree.
Go to the tab
"Co-Domains".
Click on the IP
address of the domain.
Click on "Delete".
An SSL certificate
is useful to encrypt the data transfer between your site and the
internet. You can only apply for a certificate if your reseller or the
admin has activated this feature for you. In this case you will find
the value "1" next to "SSL" on the tab "Basic Data" of your site.
1. Step: Open tab
/ enter basic data.
Go to the section
"SSL" of the site you need an SSL certificate for. Please note:
The tab "SSL" is only visible after the feature "SSL" has been
activated and saved on the tab "Basic Data".
2. Step: Apply
for the certificate.
In the field
"Action" select "Create Certificate".
Click on "Save".
Now the SSL
Certificate and the SSL Request are generated and loaded into the
respective fields in the form. Copy the SSL Request and send it to your
Certificate Authority (CA). After a while (depending on your CA) you
will get your signed certificate via email from your CA.
After you got your
certificate from your CA:
3. Step: Load
certificate.
Copy the new
certificate from the email you got from your CA and paste it into the
field "SSL Certificate".
In the field
"Action" select "Save Certificate".
4. Step: Save.
Click on "Save".
On the tab "SSL"
select "Delete Certificate" in the field "Action".
Click on "Save".
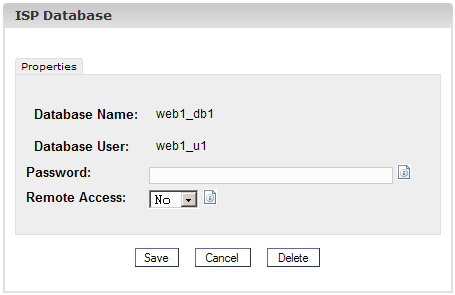
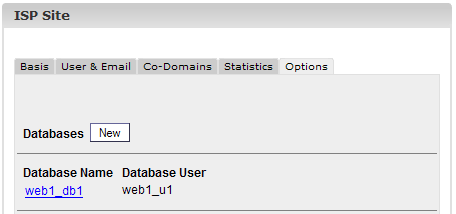
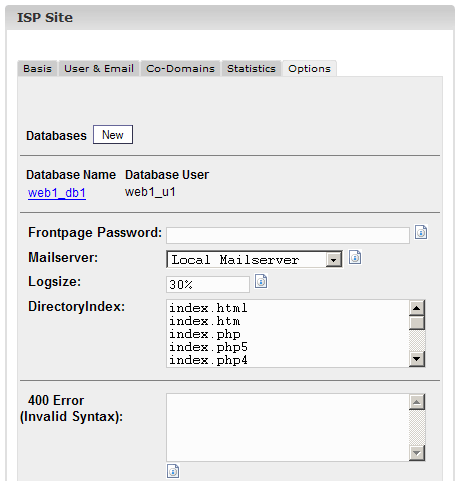
If you find the
value "1" next to "MySQL" on the tab "Basic Data" then a MySQL database
is available for the virtual site. If you want to use it you should
protect it with a password:
Go to the tab "Options".
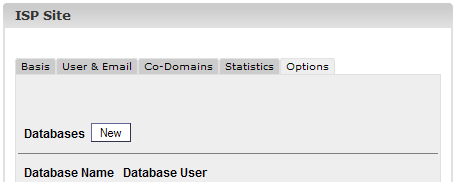
Click on "New".
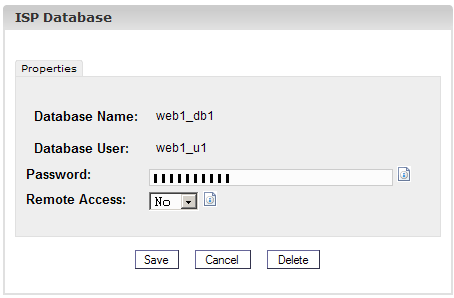
In the field "Password" enter your MySQL password.
Please note: A database is created only after a password has been entered for the first time! If a database exists (which means a password has been provided before) it looks like this:
The password is not visible for security reasons. But it can be changed at any time simply by writing a new password into the field "Password".
Click on "Save" to save this information. Click on "Reset" to abort the process.
Apart from the details referring to the MySQL database you can find the following fields on the tab "Options":
On the tab
"Statistics" you can find statistics covering the following areas:
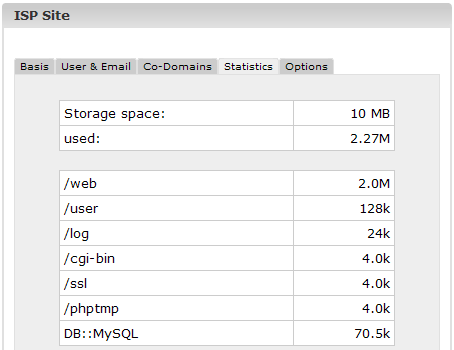
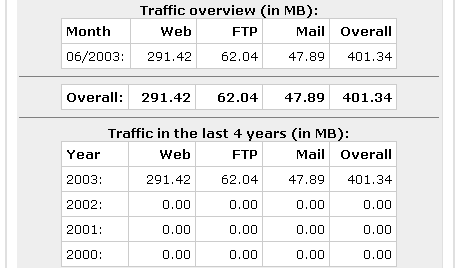
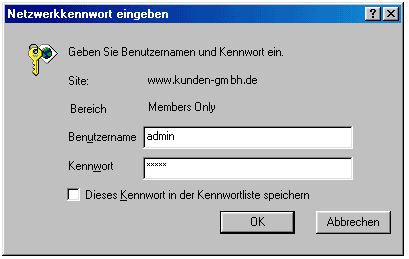
If the statistics software "Webalizer" is installed on the server, the Apache log files of the sites on the server are analysed once a night, and new statistics are created. You can see them in the folder "stats" of the respective site, e.g. http://www.domain.tld/stats/.
The statistics are password protected. To login there are the following possibilities:
Please note: If you have created a new site, the Webalizer statistics are not yet available because Webalizer is run only once a night. After 24 hours at the latest the first statistics should have been created.
If you do not have an FTP client or do not like to use it the ISPConfig system offers you the possibility to use FTP functionality via your browser.
The following functionality is offered by Web-FTP:
To use Web-FTP please select the respective site under "Web-FTP":
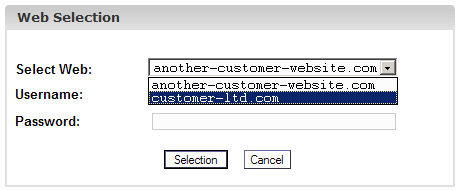
After your selection the file system of the corresponding site is shown in the structure tree.

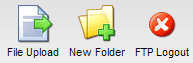
Below the menubar you can find the three buttons "File Upload","New Folder", and "FTP Logout" .
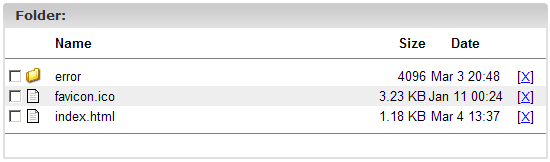
To see the contents of a folder click on the corresponding folder in the structure tree.
You will then be shown the contents of the directory.
To edit file properties please click on the name of the file. You will then be shown the properties of the file.
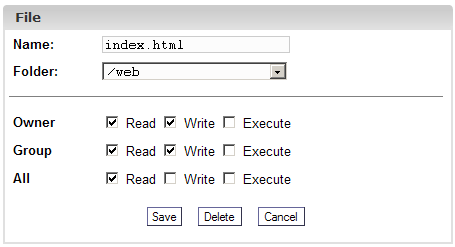
You can now rename the file, move it to another folder or change its permissions.
To see the properties of the site's basic directories "web", "user", "log", "cgi-bin" and "ssl" click on "/" in the structure tree.
![]()
If you click on a folder in the structure tree its subfolders will be shown.
The form "Folder" is loaded:

To see the properties of a folder please click on its name.
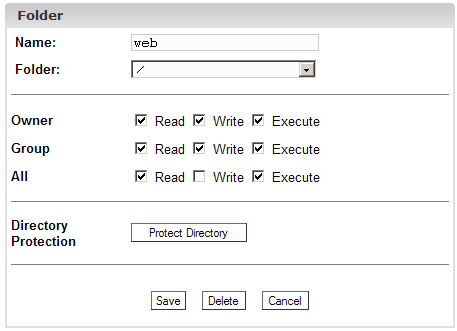
You can now edit the folder's properties.
You can protect a directory in a way that its contents is accessible in a browser only after a valid user name/password combination has been entered (see chapter III-3.2, "Webalizer Statistics").
Click on "Protect Directory".
Enter a user name and a password and click on "Save".
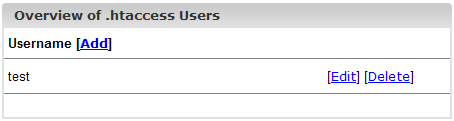
If a directory is password-protected the button "Protect Directory" is replaced by the button "Edit" in the form with the directory properties. If you click on this button existing users will be listed, and you can edit their passwords. In addition to that you can add new users.
To upload files to the server click on the button "File Upload". The form "File" is loaded.
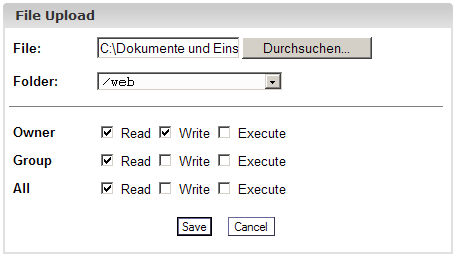
Select the file to be uploaded from your local hard disk as well as the folder where the file should be saved on the server, and specify the permissions of the file. Then click on "Save".
To create a folder click on the button "New Folder". The form "Folder" is loaded where you can specify its name, path and permissions.
To delete a file or a folder please click on the "X" on the right side of its name.
Please note: A directory has to be empty before it can be deleted!
The following additional software is available for the ISPConfig system:
If the ISPConfig administrator has installed these applications you can find links for them under "Tools".
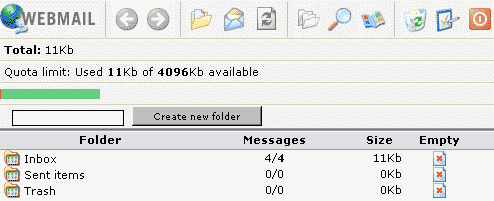
The application used as email interface is called "Uebimiau". Further information can be found on the website of the Uebimiau project: http://uebimiau.sourceforge.net/ .
The application can be accessed via the link under "Tools" or via the folder "webmail" which is located in the web of the ISPConfig system, thus https://www.domain.tld:81/webmail/ where www.domain.tld has to be replaced appropriately.
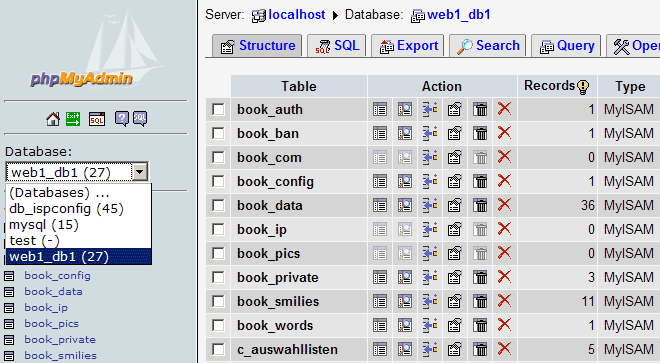
Further information about phpMyAdmin can be found under http://www.phpmyadmin.net/ .
The application can be accessed via the link under "Tools" or via the folder "phpmyadmin" which is located in the web of the ISPConfig system, thus https://www.domain.tld:81/phpmyadmin/ where www.domain.tld has to be replaced appropriately.
The following correlation exists between webquota and mailquota (see chapter III-2.2.1):
There are two possible scenarios:
The storage space used by all users of a web cannot become bigger the the value specified under "Space MB" on the tab "Basis" of a site.